Headband Tutorial...and "Rawps"
As promised, tonight I will be posting a tutorial for the flower headband I made last night (in case anyone is wondering, it fits best on the head of Little V, the smallest of the heads).
I really wanted to make this a nice, fancy tutorial where I go into Photoshop and put the text right on the photos (...ooohhh...aaaahhh...).Unfortunately, Photoshop would never even think of working on my machine and hubby's is all the way downstairs! I will put up my extremely cruddy photos for the time being and if anyone is really that interested, I might take better photos when I make the next one for Little L and if you're really interested, I'll even take the time to go all the way downstairs to add instructional text.
Now, on with the show!
What You Need:
1 nylon knee high (I suppose you could use a recycled one, but that thought makes me go, "Eeeewwww")
Scissors
Needle
Thread matching nylon color (or kinda matching, if your a little short on thread colours, like me)
Artificial flower
Glue gun and glue sticks
Hair clip (the name of the type eludes me at the moment - fill me in if you know)
What You Do:
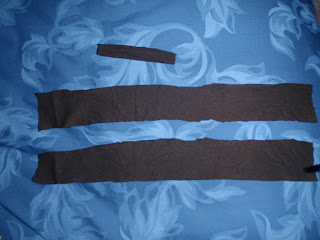
1) Cut the toe and the top band (what is that called?) off of a the knee-high.
2) Cut the nylon in half vertically and the band in half horizontally so that you are left with this (plus one more "half band" which somehow didn't make it into the photo):
3) Sew the open side of the half band and the half nylon together by hand (if your a crazy sewing machine deprived freak, like me) of with a sewing machine. Turn each piece inside out. You will have something that looks like this:

4) Loop the small band around the large band and sew the ends of the small band together.
5) Sew the ends of the large band together resulting in this:
 5) Snip a blossom off a bouquet of artificial flowers and glue to the hair clip (I added a leaf too). Then, clip the clip to the small band.

6) Find the only model in your house that is not asleep and snap away! (Doesn't "Sweater Bear" look dashing?)
So, there you have it - my very first tutorial. Yes, I've read it over, yes I realise that it doesn't make perfect sense, and yes, I'm posting it anyway! If you have questions, feel free to ask and I'll be happy to clarify.
Now, a couple of my favorite shots from today because I can't resist. This is also how I ensure that my blog has at least on regular reader - my Mom!
 Little L after discovering that throwing her ball onto the slide would result in it rolling back.
 Little L off in the corner of of the yard "discovering" while yelling back to us "Rawp! Rawp!"

Little V resting after a long hard day of Salsa dancing and playing.
Goodnight, all!


Comments
Post a Comment